前端对接GPT实现打字机效果
序言
现在GPT可为非常火热,我们在这篇文章中将会研究如何通过 HTTP 请求和 SSE(Server-Sent Events)协议连接,并实现了基于流式 API 的长时间运行的聊天打字机效果,即用户输入一条消息后,模型逐步返回一个完整的对话内容。
分析原因
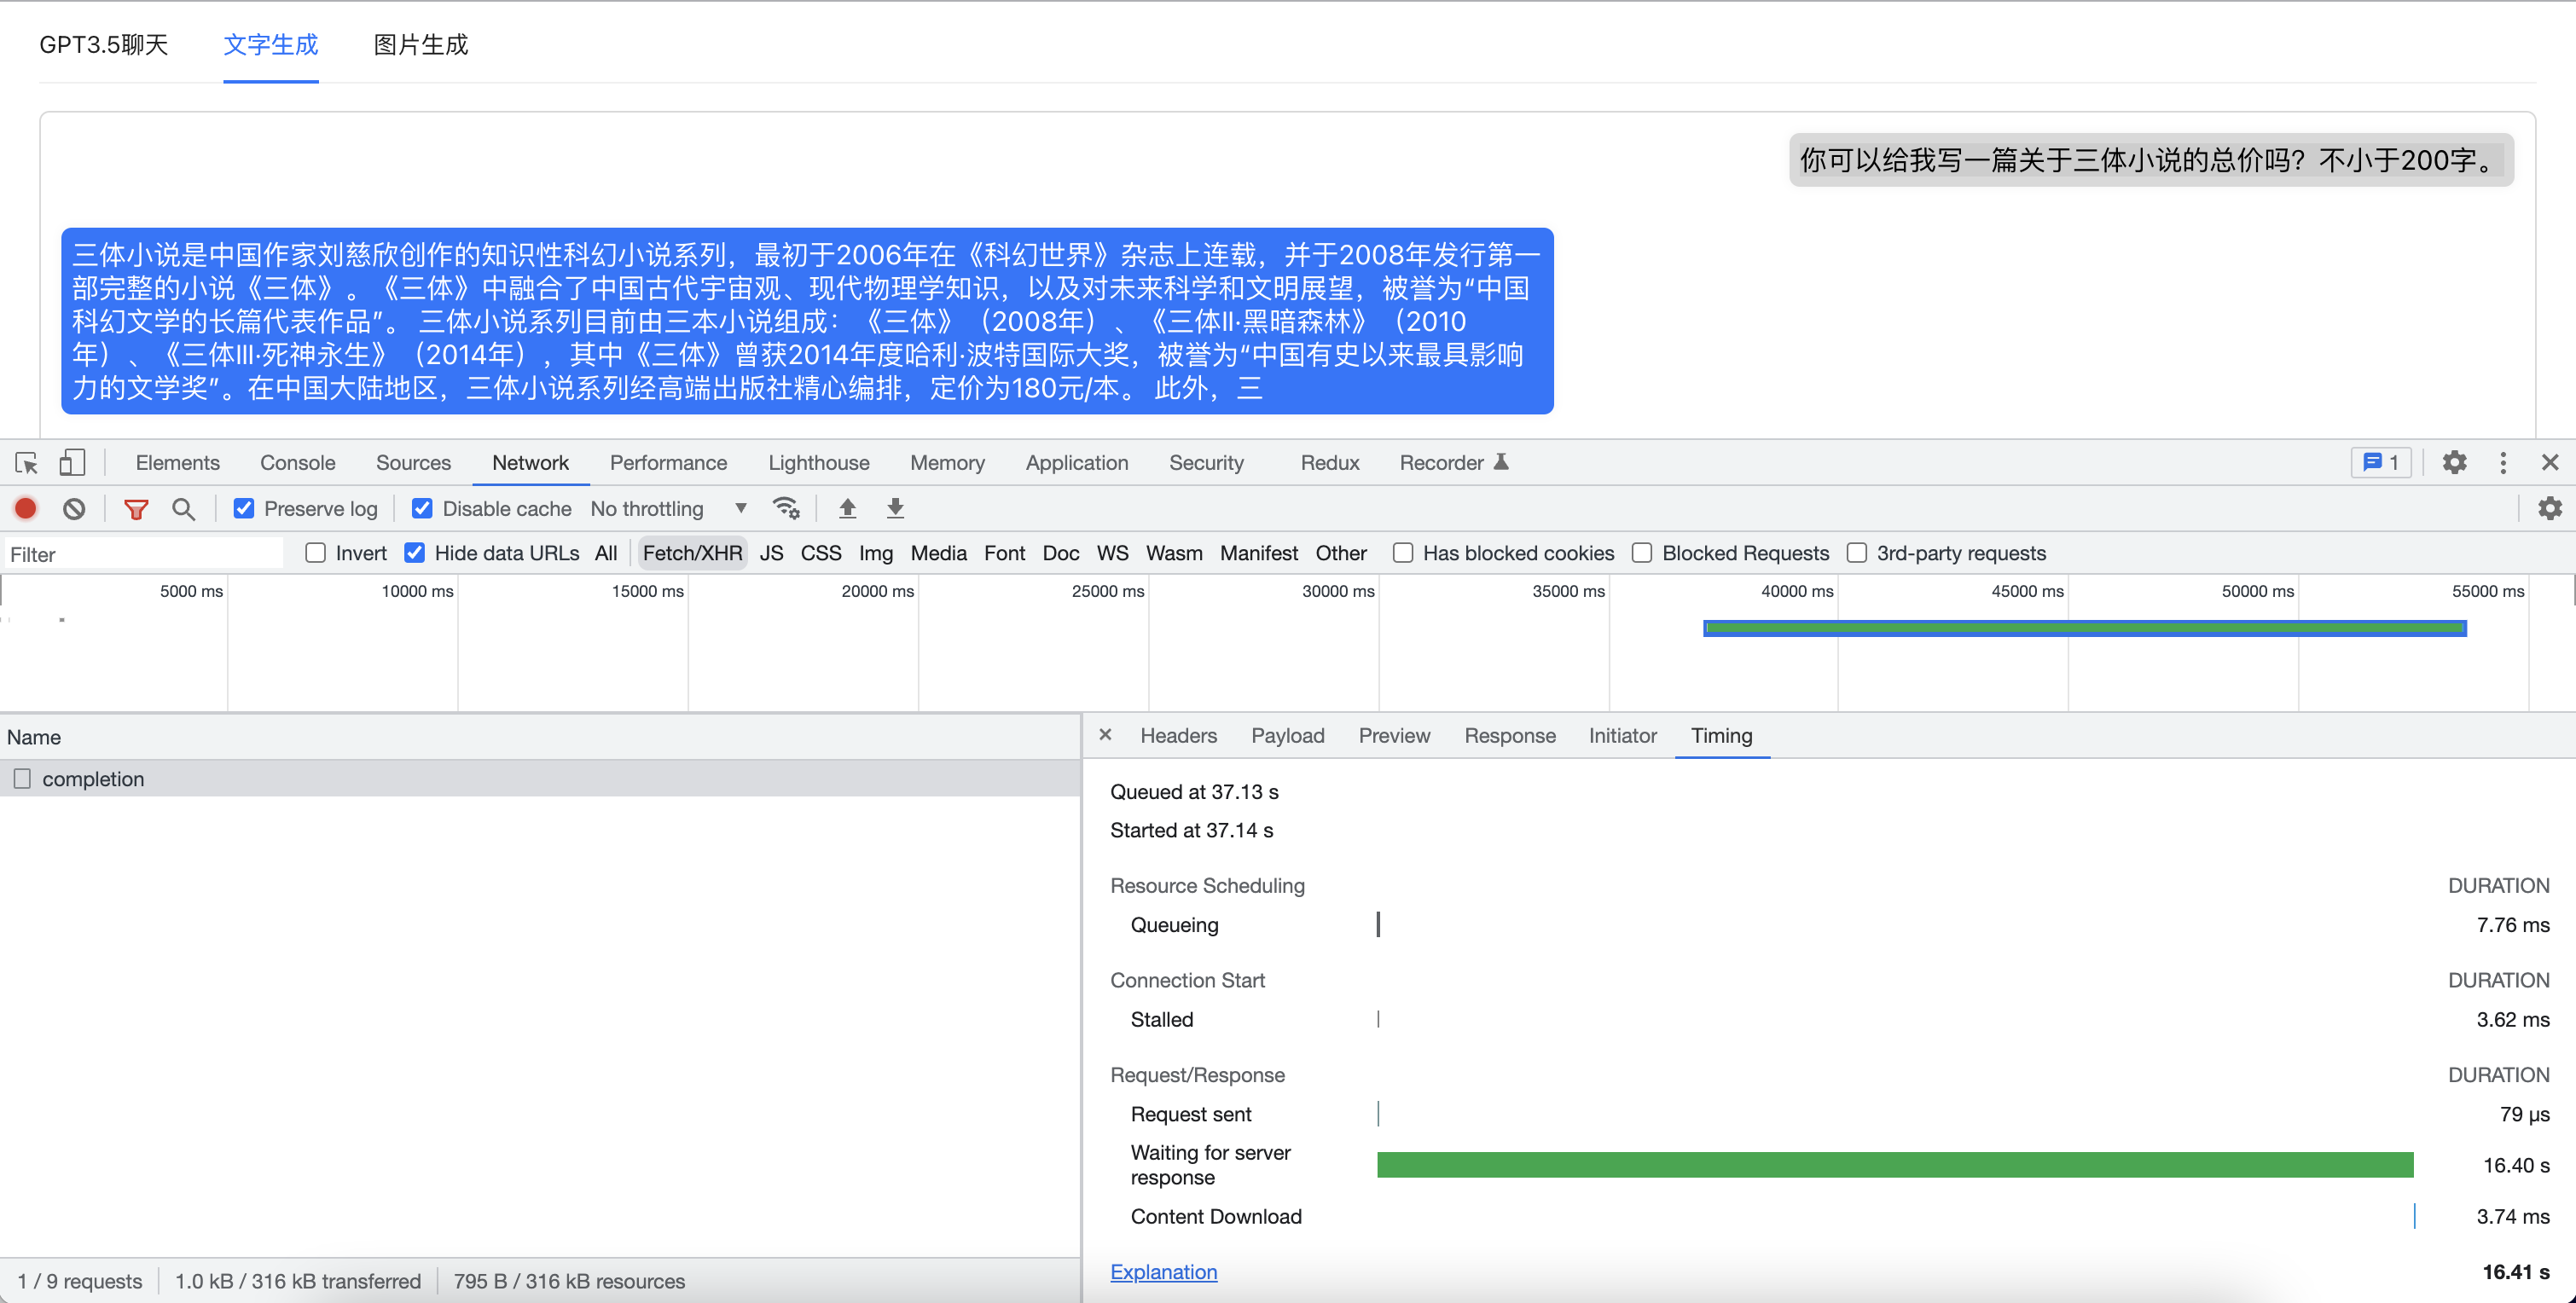
首先我们看看正常的api请求都是都是需要后端处理完成数据后,把数据打包好再一次性发送到前端。 但是由于GPT需要完成所有文字的生成之后才会进行返回,神经网络生成长文章可能需要15s甚至更长的时间,所以我们可以看到如果GPT生成返回的内容越多,接口返回的速度就回越慢。平均返回时间一般可以达到15s以上。而且由于网络、墙等问题,很容易让用户产生是否接口请求失败了,于是刷新页面重新请求的操作。
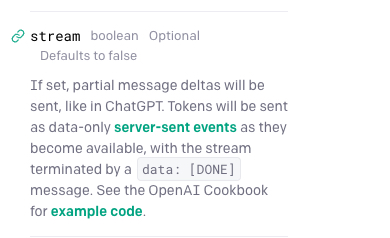
由于GPT内容生成模型是以token为单位进行内容生成的,即不需要等待所有内容生成完成即可有数据返回。这时我们可以使用GPT api提供的stream参数,这个参数会让GPT立刻返回新生成的token内容,服务器会把token作为纯数据向客户端发送事件,就像在 ChatGPT 中一样,如果内容发送完成了,将以data: [DONE]结束。
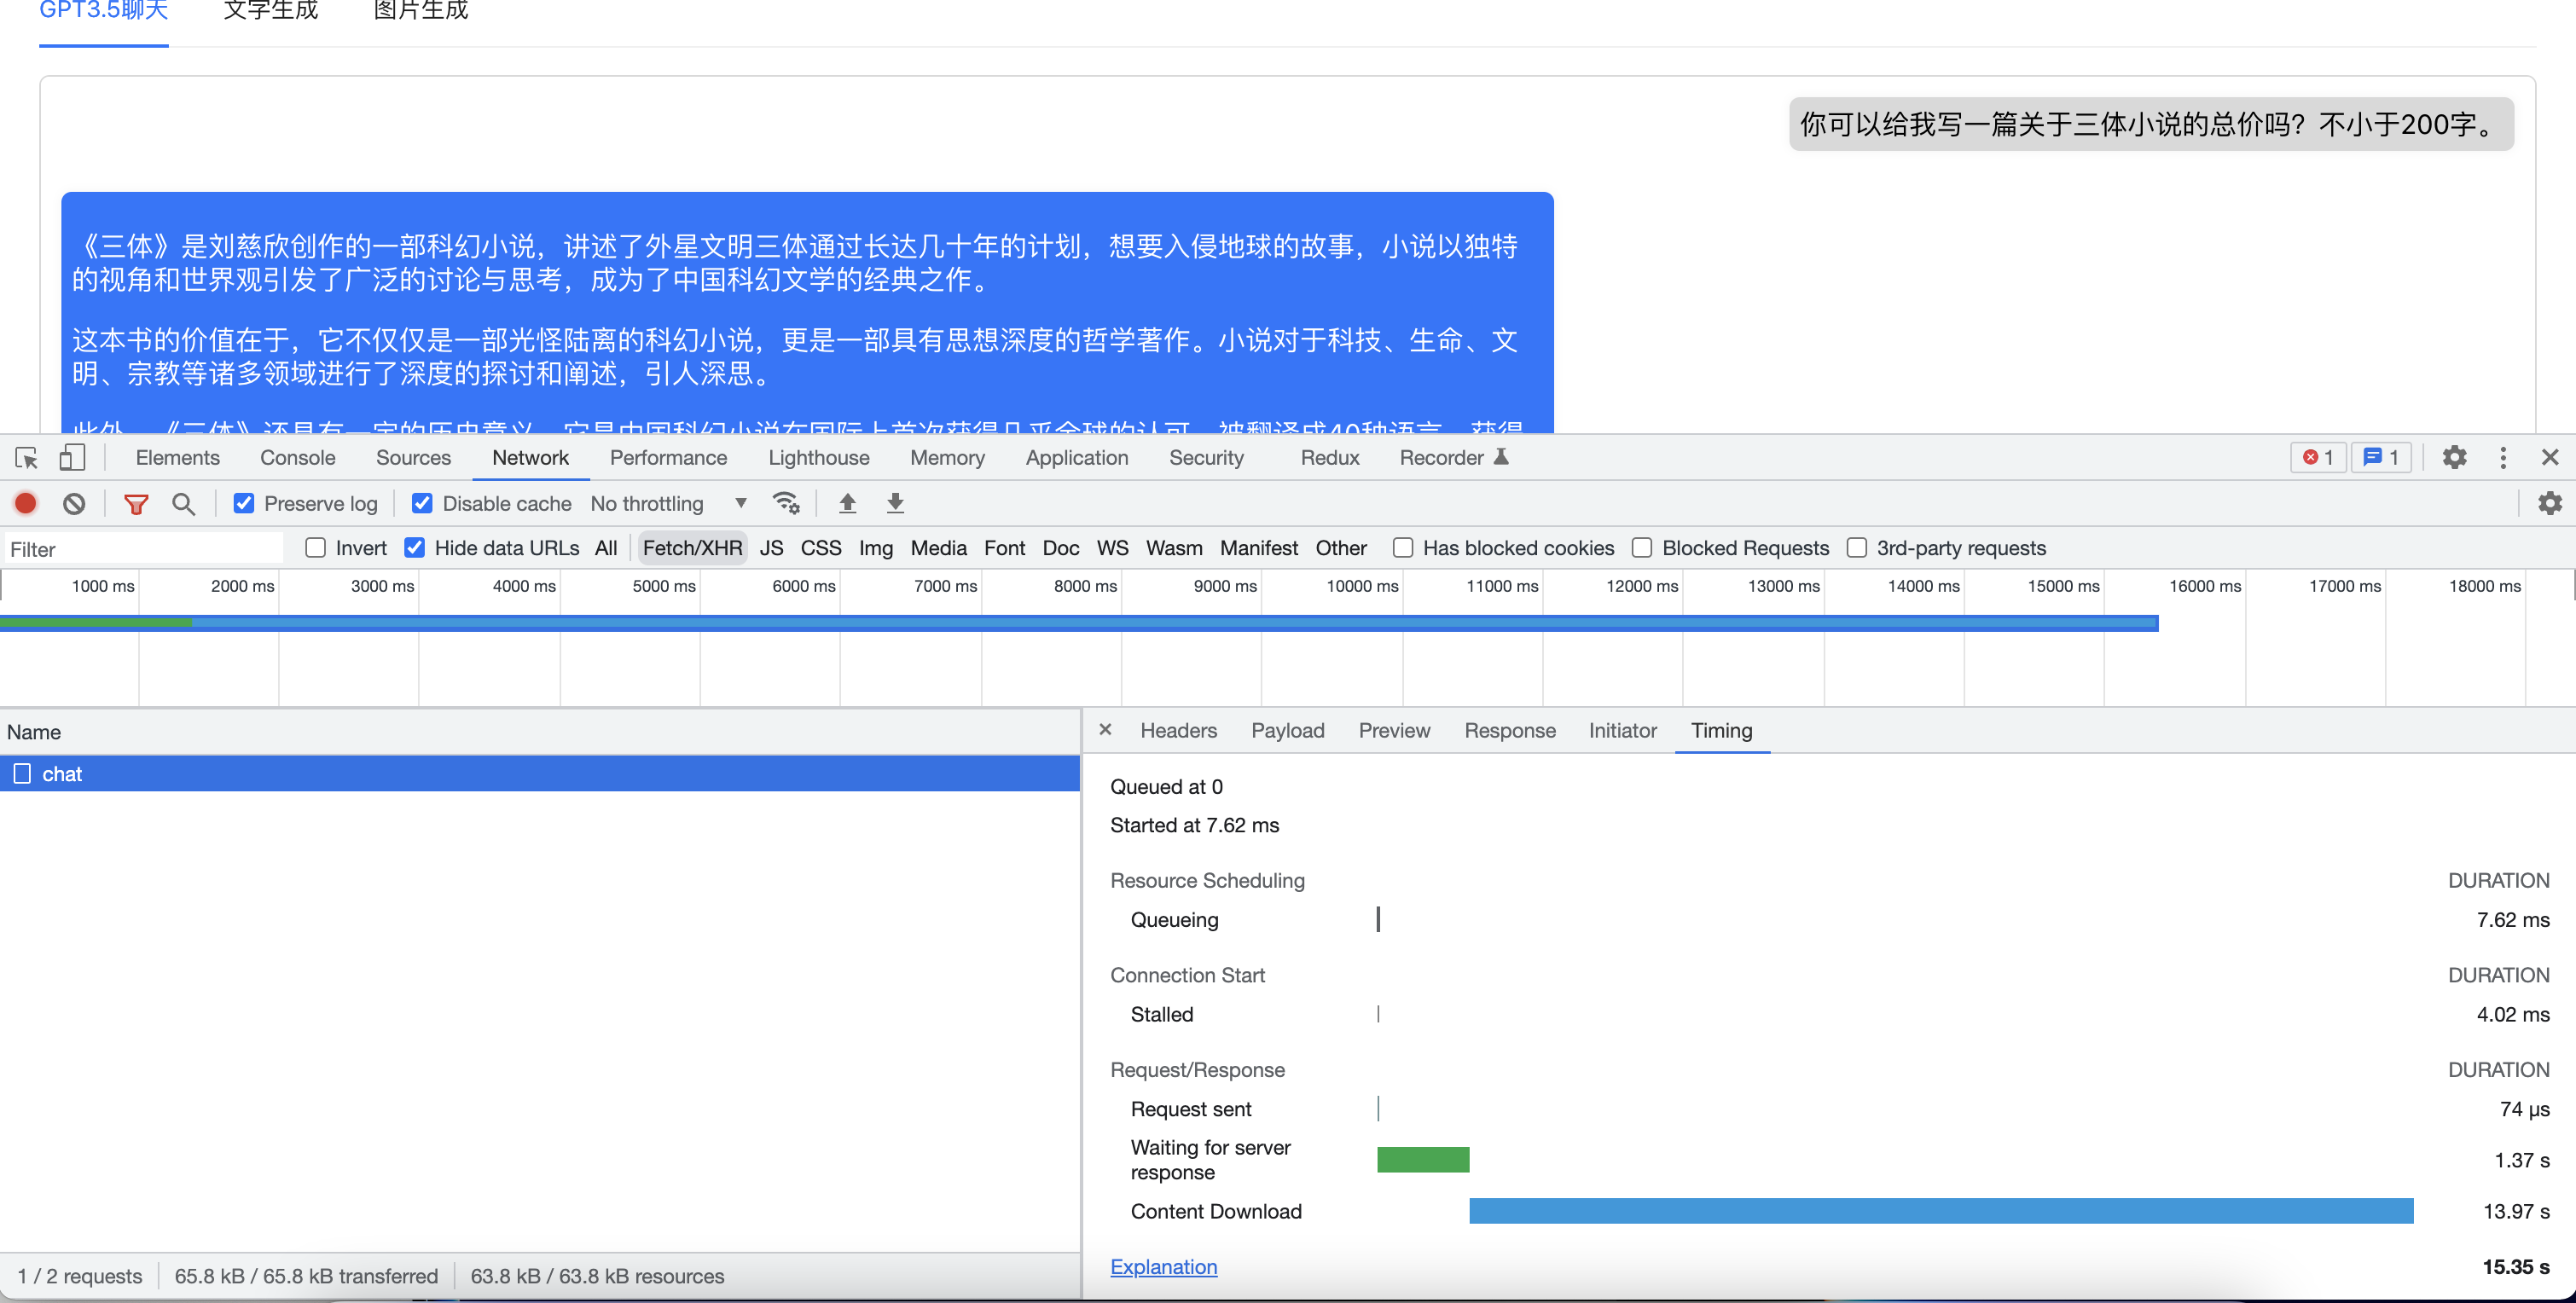
这样我们就可以在GPT生成第一个token的时候即可以得到数据反馈并进行展示,减少了用户的等待时间,极大提升用户体验。如下图中,我们测试的问题只用了1.37s即有第一批token返回。
在我们了解了优化方式之后,我们就可以开始进行撸代码了。
前端实现
那么我们需要怎么在前端去接受这种SSE的请求呢?简单的SSE GET请求可以通过EventSource来实现。但是由于GPT的chat和completions接口都是POST请求,所以我们需要稍微绕一下弯路,通过fetch来实现。下面直接上代码。
1
2
3
4
5
6
7
8
9
10
11
12
13
14
15
16
17
18
19
20
21
22
23
24
25
26
27
28
29
30
31
32
33
34
35
36
37
38
39
40
41
42
43
44
45
46
47
48
49
50
51
52
53
54
55
56
57
58
59
60
61
62
63
64
65
66
67
68
69
70
71
72
73
74
75
76
77
78
79
80
81
82
83
84
85
86
87
88
89
90
91
92
| const response = await fetch('http://localhost:8080/api/chatGPT/chat', {
method: 'POST',
headers: {
"Content-Type": "application/json",
},
body: JSON.stringify({
messages,
...config,
}),
})
const reader = response?.body?.getReader();
const decoder = new TextDecoder("utf-8");
let result = ''
const readChunk = async () => {
return reader?.read().then(({ value, done }) => {
if (!done) {
const dataString = decoder.decode(value);
dataString.toString().trim().split("data: ").forEach(async (line) => {
if (line !== '') {
const text = line.replace("data: ", "")
try {
const data = JSON.parse(text)
console.log(data.choices[0])
if (data.choices[0].delta.content) {
result += data.choices[0].delta.content
const resList = _.cloneDeep(newList)
resList[resList.length - 1] = {
content: marked.parse(result),
role: 'assistant'
}
setTextList(resList)
}
if (data.choices[0].finish_reason === 'length') {
console.log('token 不足,请再次提交')
setChatLoading(false)
return
} else if (data.choices[0].finish_reason === 'stop') {
const resList = _.cloneDeep(newList)
resList[resList.length - 1] = {
content: marked.parse(result),
role: 'assistant'
}
setTextList(resList)
setChatLoading(false)
return
}
return readChunk();
} catch (error) {
console.error(error)
console.log(text)
if (text.trim() === '[DONE]') {
const resList = _.cloneDeep(newList)
resList[resList.length - 1] = {
content: marked.parse(result),
role: 'assistant'
}
setTextList(resList)
return
}
setChatLoading(false)
}
}
setTimeout(() => {
let scroll_to_bottom = document.getElementById('chat_gpt_text_list');
scroll_to_bottom?.scroll({top: scroll_to_bottom.scrollHeight, behavior: "smooth"})
}, 50)
})
} else {
console.log("done");
}
});
};
await readChunk();
|
这里使用了 marked.js 库,用于将 Markdown 格式文本转换为 HTML 格式。
通过 fetch 向 Node.js 服务器发送一个POST请求包含用户第一条消息内容的 JSON 对象,并将 HTTP 响应的流数据解析为字符串并逐行处理。
在每次从流中读取到的新数据中,将 JSON 字符串解析为对象后提取出模型生成的回复文本,并使用 marked.js 将其转换为 HTML 文本。
当模型返回的 finish_reason 字段为 “stop” 或者 “length” 时,停止递归调用 readChunk() 函数并更新 React 中 state 的状态,触发更新渲染。
koa后端
实现完前端,我们再来看看后端代码实现。这里就简单用koa做一个代理转发,其实也可以前端直接调用GPT api的地址。但是由于GPT和国内双向屏蔽,所以还是部署一个国外的服务器比较省心。
下面是koa端的Service层代码。引用了openai的包,并按照GPT api的接口文档进行对接。
1
2
3
4
5
6
7
8
9
10
11
12
13
14
15
16
17
18
19
20
21
22
23
24
25
26
27
28
29
30
31
32
33
34
35
36
37
38
39
40
41
42
43
44
45
46
47
48
49
50
51
52
53
54
55
56
| const { Configuration, OpenAIApi } = require('openai');
const configuration = new Configuration({
organization: process.env.OPENAI_API_ORGANIZATION,
apiKey: process.env.OPENAI_API_KEY,
});
const openai = new OpenAIApi(configuration);
const createCompletion = async (params) => {
const response = await openai.createCompletion({
model: params.model || "text-davinci-003",
prompt: params.prompt,
temperature: params.temperature || 0.9,
max_tokens: params.max_tokens || 200,
top_p: params.top_p || 1,
frequency_penalty: 0,
presence_penalty: 0,
});
return response.data.choices[0].text
}
const createChatCompletion = async (params) => {
const response = await openai.createChatCompletion({
model: params.model || 'gpt-3.5-turbo',
messages: params.messages || [],
temperature: params.temperature || 0.9,
max_tokens: params.max_tokens || 200,
top_p: params.top_p || 1,
frequency_penalty: 0,
presence_penalty: 0,
stream: true
}, { responseType: 'stream' })
return response.data
}
const createImage = async (params) => {
const response = await openai.createImage({
prompt: params.prompt,
n: 1,
size: '512x512'
});
return response.data.data
}
const getListModels = async (params) => {
const response = await openai.listModels();
return response.data
}
module.exports = {
createCompletion,
createChatCompletion,
createImage,
getListModels
};
|
下面是koa的Controller层的代码,定义了一些返回包体的结构
1
2
3
4
5
6
7
8
9
10
11
12
13
14
15
16
17
18
19
20
21
22
23
24
25
26
27
28
29
30
31
32
33
34
35
36
37
38
39
40
41
42
43
44
45
46
47
48
49
50
51
52
53
54
55
56
57
58
59
60
61
62
63
64
65
66
67
68
69
70
71
72
73
74
75
76
77
78
79
80
81
82
83
84
85
86
87
88
89
90
91
92
93
| const { createCompletion: createCompletionHelper, createChatCompletion: createChatCompletionHelper, getListModels: getListModelsHelper, createImage: createImageHelper } = require('../helpers/chatGPT.helpers');
const ErrorShowType = {
SILENT: 0,
WARN_MESSAGE: 1,
ERROR_MESSAGE: 2,
NOTIFICATION: 3,
REDIRECT: 9,
}
const createCompletion = async (ctx) => {
try {
ctx.body = {
success: true,
data: await createCompletionHelper(ctx.request.body)
}
ctx.status = 200;
} catch (err) {
console.log(err);
ctx.body = {
success: false,
data: null,
errorCode: 500,
errorMessage: err,
showType: ErrorShowType.ERROR_MESSAGE,
};
ctx.status = 500;
}
};
const createChatCompletion = async (ctx) => {
try {
ctx.body = await createChatCompletionHelper(ctx.request.body)
ctx.status = 200;
} catch (err) {
console.log(err);
ctx.body = {
success: false,
data: null,
errorCode: 500,
errorMessage: err,
showType: ErrorShowType.ERROR_MESSAGE,
};
ctx.status = 500;
}
};
const createImage = async (ctx) => {
try {
ctx.body = {
success: true,
data: await createImageHelper(ctx.request.body)
}
ctx.status = 200;
} catch (err) {
console.log(err);
ctx.body = {
success: false,
data: null,
errorCode: 500,
errorMessage: err,
showType: ErrorShowType.ERROR_MESSAGE,
};
ctx.status = 500;
}
};
const getListModels = async (ctx) => {
try {
ctx.body = {
success: true,
data: await getListModelsHelper()
}
ctx.status = 200;
} catch (err) {
console.log(err);
ctx.body = {
success: false,
data: null,
errorCode: 500,
errorMessage: err,
showType: ErrorShowType.ERROR_MESSAGE,
};
ctx.status = 500;
}
};
module.exports = {
createCompletion,
createChatCompletion,
createImage,
getListModels
};
|
这个时候,我们就已经完成了GPT的对接以及前端实现快速响应,以及打字机展示结果的展示效果。这个是我最近对GPT的一些前端研究,希望各位如果有什么更新颖的想法以及应用,欢迎交流。
本文的代码都会放在 https://github.com/zjw93615/gtp-demo 仓库中,欢迎各位查漏补缺。